Stylish yet simple GUI for Python that users, backend developers and data scientists would immediately fall for

Yes, this is all about Streamlit, a UI that is written solely in pure Python code and lets you see the output directly in the web browser instead of the IDE console. The cherry on top is that it supports all widely used data visualizations such as Matplotlib, Altair, Vega-lite and others. Moreover, Streamlit community is very open to discussion about the new features and supportive. Finally, deployment of your finalized product is pretty easy as it correlates with your project repository on GitHub.
This article will provide a step-by-step guide on how to create a simple Streamlit ML topic recognition app and some useful tips on how to customize its design.
Step 1: Getting started
First, you need to install the library.
pip install streamlit Then, you create a directory my_streamlit_app (or any other name) and add the file My_app.py where you import all necessary libraries. Our app would predict the topic.
import streamlit as st
import topic_recognition
I have already trained my Multi-label classifier using Scikit-learn and tfidf vectorizer. Here is a similar problem explained in detail.I have three separate files: one for creation and fitting the model; one for the input text preprocessing and topic prediction, and one more with my Streamlit app. In the app I imported the file where the topic would be predicted for the user input text. The dataset, trained model, vocabulary and binarizer are saved in the my_streamlit_app directory.
Step 2: Design your app
from PIL import Image
st.title("Topic recognition app :memo:")
img = Image.open("Image.jpg")
st.image(img)
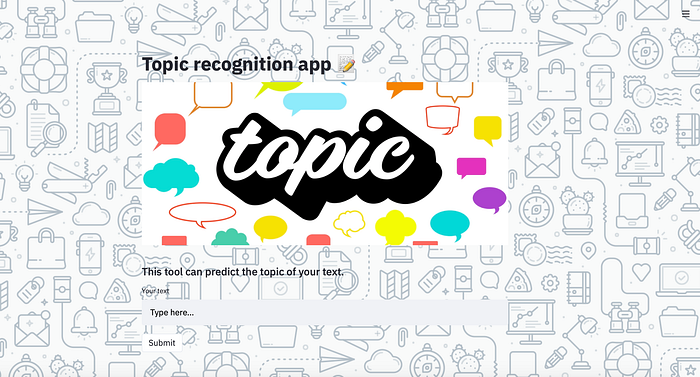
st.subheader("This tool can predict the topic of your text.")
The syntax of Streamlit is pretty straightforward. It supports markdown, you can paste emojis and include quite standard for such libraries widgets as a slider, radio buttons, checkboxes, select boxes, and also videos and audios. The full guide on interactive features could be found in its documentation.
Now we need to add the text area for the user to input text and a ‘Submit’ button.
text_input = st.text_input(label='Your text')
submit_button = st.button(label='Submit', value="Type here...")
This is what the user will see:

Alternatively, you can upload a user’s text using through the upload file option.
pip install PyMuPDFAfter you have installed the packages for reading a pdf file, open and read it in your app.
import fitzuploaded_pdf = st.file_uploader("Load your pdf file: ", type=['pdf'])

if uploaded_pdf is not None:
    with fitz.open(stream=uploaded_pdf.read(), filetype="pdf") as doc:
        text_input = ""
        for page in doc:
            text_input += page.getText()
        st.write(text_input)
        doc.close()
else:
    st.write("File not found")
The output would be as below:

If you want to customize background you can add these functions and upload your image.
import base64@st.cache( allow_output_mutation=True )
def get_base64_of_bin_file(bin_file):
    with open( bin_file, 'rb' ) as f:
        data = f.read()
    return base64.b64encode( data ).decode()

def set_png_as_page_bg(png_file):
    bin_str = get_base64_of_bin_file(png_file)
    page_bg_img = '''
    <style>
    body {
    background-image: url("data:image/png;base64,%s");
    background-size: cover;
    }
    </style>
    '''% bin_str

    st.markdown(page_bg_img, unsafe_allow_html=True)
    return

set_png_as_page_bg('background.png')

You can also choose one of the themes or a customized one. More information in Streamlit blog.
Step 3: Add your model
Simply add one line of code:
st.write('Predicted topic: {topic}.'.format(topic= topic_recognition.predict_topic(text_input)))
We can also add some editing features to make our results more readable.
- Markdown
st.write('Predicted topic: **{topic}**.'.format(topic= topic_recognition.predict_topic(text_input)))
2. Text annotation
from __init__ import annotated_textdef annotation(text):
    topics = topic_recognition.predict_topic(text)
    text_with_annotations = []
    for i in range(0,len(topics)):
        topic = topics[i]
        text_with_annotations.append((topic, "", "#8ef"))
    annotated_text(50,"Predicted topic: ", *text_with_annotations)

annotation(text_input)

The full guide on how to work with annotated text can be found here. Streamlit works with JavaScript and HTML components as we could see and that could be rendered in your apps.
Step 4: Running your app
To run your app in a browser just type in your terminal:
streamlit run app.pyand your app would start on http://localhost:8501.
Step 5: Deployment
After you have added all the features you wanted you can deploy your app. To do this you need to click your mouse at the top right corner and choose ‘Deploy this app’.

Once you press it, you go to https://share.streamlit.io/ where you can authorize using your GitHub account and choose repository name or paste the link to your app.py file. In order to deploy your app, you need to have the file requirements.txt with the list of all libraries that need to be installed. In my case this file looks like this:

You can read more here on how to set requirements for further packaging.
You can also deploy your app using Docker and Heroku.
Conclusion:
Pros of using Streamlit:
- quite easy intuitive syntax
- support of HTML and JavaScript components
- active community
- fast adding of new features
- cover most UI widgets
- support multiple interactive visualizations
Cons:
- inability to embed your own chunks of code, hence, it is impossible to go far from the standard Streamlit interface
- My app included multiple models and I could deploy it both through docker and git, however, the models in the shared version did not predict anything. I would further investigate this and will be glad to hear suggestions.
All in all, thank you very much for reading. Please leave comments if you have any questions and clap if you like this story.
